Tag: Aperture 3

Lowering the Caisson into the Pier Casing

Lowering the Caisson into the Casing.

Click on the image to enlarge it in a new window.

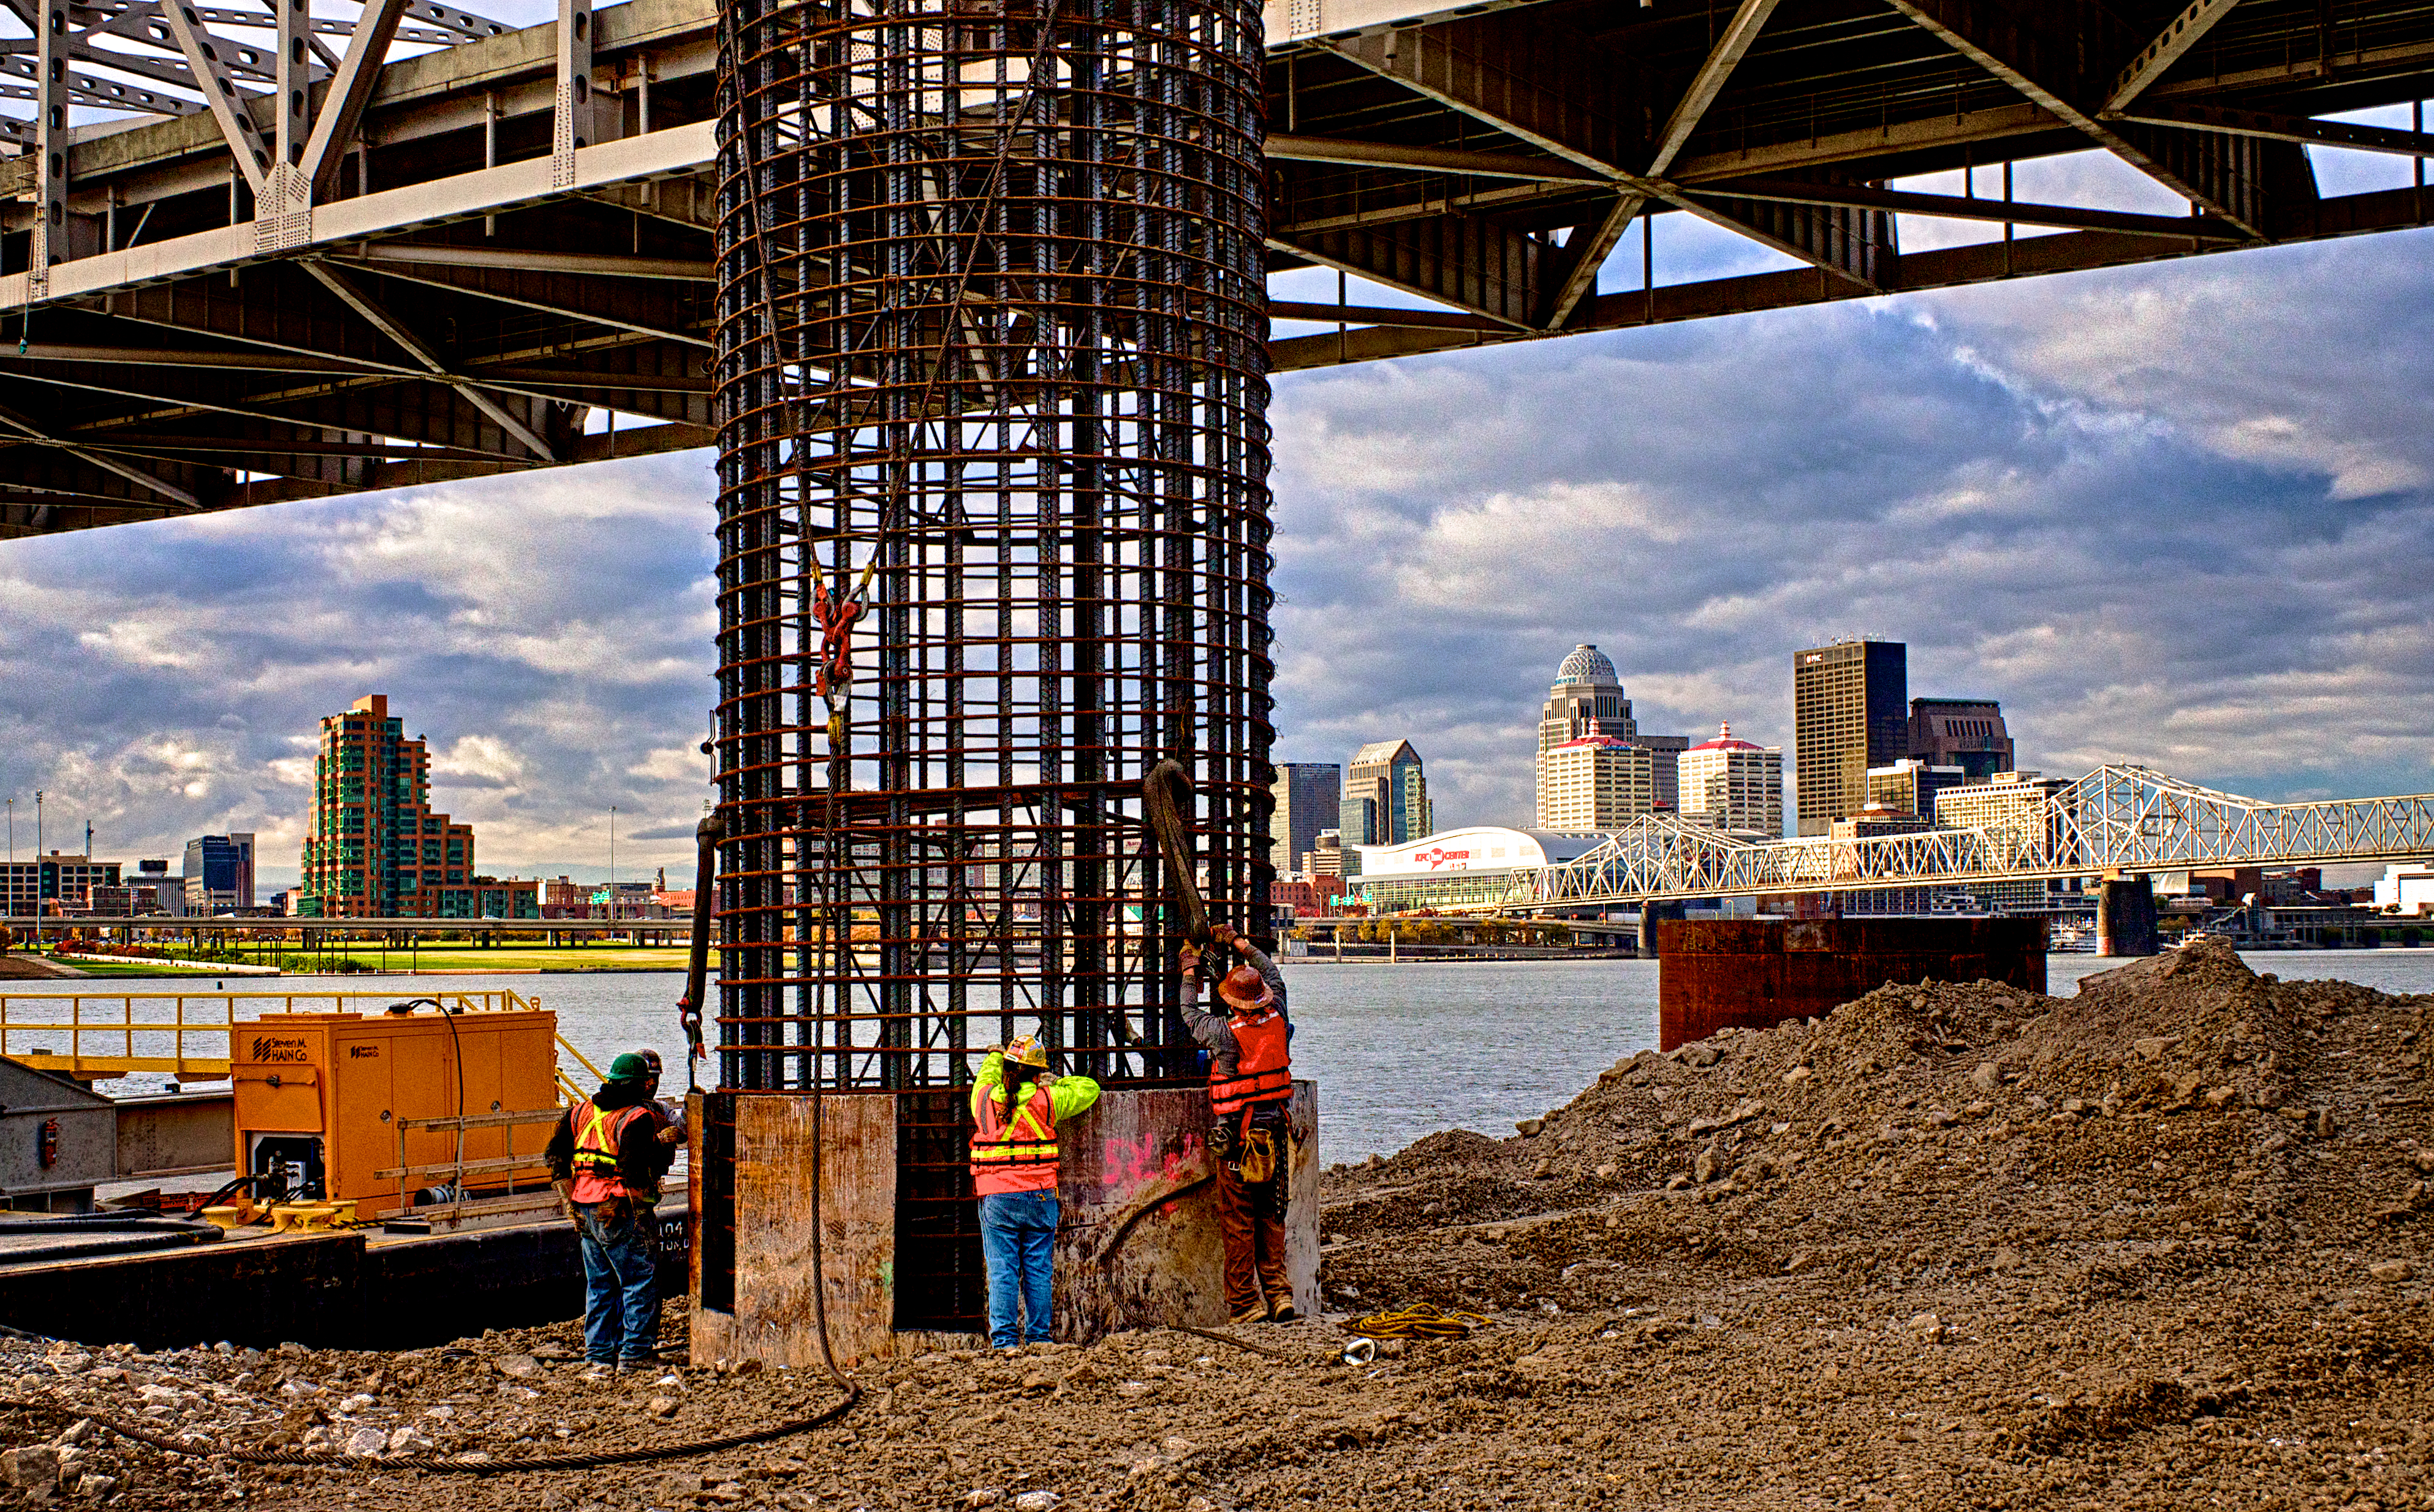
This HDR image shows the 60 foot long caisson as it is being guided, by the Ironworkers and Carpenters, into place inside the pier casing. After placing the caisson the next step will be to fill the pier with concrete. The steel casing sits on the river bottom and then the caisson fits into a rock socket has been bored 30 feet below the casing into the bedrock of the river bottom. This makes the total length on the pier nearly 60 feet from the surface to the base. The iron cylinder is there to both guide the drill during drilling and to form a protective shell for the pier once the bridge is built.

This image is from a three frame bracket set using -2, 0 and +2 EV settings. I merged the bracket set in NIK HDR Efex Pro 2 and because the workers were moving quite a bit I had to apply 80% anti-ghosting to isolate them and remove the ghosts of their arm movement. After merging and some mild tone-mapping in NIK HDR Efex Pro 2 I returned the merged file to Aperture 3 where I completed my processing by adjusting contrast, alignment, sharpening and the individual color channels to achieve the look I wanted for the final image.

Caisson Pick

Lifting the Caisson Into Place
Moving the Caisson Into Place

Click on the image to enlarge it in another window.

Yesterday morning the caisson for the bridge pier, 6R2, was moved into place inside the 12 foot diameter steel casing that will protect the bridge piers from damage once the bridge is finished and the river channel is reopened. The rebar caisson is over 60 feet long and moving it requires excellent coordination between the crane operator and the crew on the ground. The caisson must be precisely placed so that the connections to the next components of the tower can be completed. Not only are there Ironworkers involved but additionally there are Carpenters, Pile Drivers and Surveyors that have specific roles to play when these caissons are positioned. The men in the foreground are surveyors whose role is to make sure that the attachment points are properly aligned by accurately measuring exactly where the caisson is situated in the bore. Once all that is completed the cylinder will be poured full of concrete and the pier will be ready for the next piece to be attached.

This is a three frame bracket set of images shot at -2, 0 and +2 EV. The three images were merged in NIK HDR Efex Pro 2 to create the HDR image. After merging and tonemapping the image was returned to Aperture 3 for final processing.

Sunrise Over the Ohio River Bridges Project

Ohio River Bridges Project Morning

Click on the image to enlarge it.

Today’s HDR image is from the Ohio River Bridges Project, Downtown Span, being built by Walsh Construction on the Ohio River in Louisville Kentucky; they are now working on the foundation for every pier across the river. This view is from the Indiana shore in Jeffersonville looking east. There are cranes on barges across the river; each one doing some piece of work essential to the foundation prep work. Looking south there are also cranes along the horizon where work is also progressing on the rebuilding of Louisville’s Spaghetti Junction which will tie the existing freeways into the new Ohio River Downtown Span.

I used my usual three bracket set of -2, 0 and +2 EV to capture the broad dynamic range in the scene. In my processing I first merged the three images in NIK HDR Efex Pro 2 where I tone-mapped it before bringing the HDR image back into Aperture and into onOne Perfect Layers where I used some adjustment layers to intensify and enhance to colors in the scene. I also applied my sharpening in onOne Perfect Effects before saving the image for the web from Aperture 3.

Excavator Teeth

Excavator Teeth
Excavator Teeth

Click on the image to enlarge it in a new window.

Sometimes the simplest approach to processing with plug-ins can yield good results without a lot of time consuming steps. A case in point is this image that I used Topaz Adjust on to create a faux HDR version. I worked with the zero EV frame and applied the Spicify preset. I then tweaked the sliders in Spicify to get the texture and contrast I wanted, then I returned it to Aperture 3 and sharpened it for the final image you see here. While in Topaz Adjust I also added a small black border that, to my thinking, helps isolate the image on the page.

==========================================================

I have an affiliate relationship with Topaz Labs, and earn a small commission on any sales that are made by using the Topaz Labs link below, which helps support this site. Even if you aren’t ready to make a purchase you can use the link to access a Free 30 day Trial of Topaz Labs products to determine whether or not they will fit your own digital workflow.

http://www.topazlabs.com/705.html

==========================================================

Exploring Topaz and NIK Plugins

Crane Operator Silhouette (Topaz Adjust Version)

Click on the image to enlarge it in another window.

Last week I was shooting in the eastern approach section of Spaghetti Junction to create a record of the work going being done by Walsh Construction as the Ohio River Bridges Project progresses. Currently there is  a lot of preparation going that is primarily focused on the foundation work for the overpasses and ramps that will make up the revamped Spaghetti Junction portion of the project. There are several cranes in this section that are driving piles to anchor the new Spaghetti Junction overpasses and ramps.

On this particular morning the sky was very dramatic and I wanted to capture the sunrise and the clouds. As I walked through the area I came upon this crane operator who was clearing the windows on his crane of the morning dew. I thought he would make a good silhouette against the sky so I shot my customary three shot bracket set of +2, 0 and -2 EV in anticipation of creating an HDR image of the scene. As I was preparing to edit the bracket set I decided instead to use only the 2 stop underexposed frame and experiment more with some of the Topaz Adjust, Topaz Clarity and Topaz ReStyle plugins.

For this first image I decided to use Topaz Adjust to see what I might discover. I like the Spicify preset so I used that as my basis for this image. As with most of my plugin use I began with the preset and then started adjusting the sliders to get just the right combination for my concept of the image. I seldom simply apply a preset and move on since I consider the presets to be starting points not end results. After using  Topaz Adjust to get the shadows and highlights where I wanted them I returned the image to Aperture 3 for final adjustment and finishing.

Crane Operator Silhouette  (Topaz Clarity Version)
Crane Operator Silhouette (Topaz Clarity Version)

Click on the image to enlarge it in another window.

For this second image I decided to use Topaz Clarity to see what result it would give me. I used the Color and Contrast 1 preset as my starting point and then went into the color channels adjustments to bring out the sky and the faint glow of the crane’s windows. I made some small adjustments to the contrast to reveal a small amount of detail in the silhouette of the crane and the operator. I didn’t take the image back into Aperture 3 for any additional adjustments, like I usually do after applying a plugin, since it looked like it was as saturated and defined as I wanted it.

Crane Operator Silhouette (NIK Viveza Version)

Click on the image to enlarge it in another window.

Finally I decided to try out the NIK Viveza plugin to see what results it would produce. As you can see it produced an entirely different coloration of the clouds and sky and left the crane operator rendered as a full silhouette without any indication of detail in the shadows. I also used a slightly different crop on this image because of the lack of recognizable detail in the shadows which threw the larger composition out of balance with too much black space in the lower right hand side.

I like all three versions for different reasons but my main takeaway is that through the use of different plugins it is possible to take an underexposed image and still create something that is pleasing and acceptable. In the future I will probably continue with merged bracket sets and HDR processing for most of my work but on occasion I can always apply Topaz and NIK plugins to create powerful images from a single frame.

==========================================================

I have an affiliate relationship with Topaz Labs and earn a small commission, which helps support this site, on any sales that are made by using the Topaz Labs link below. Even if you aren’t ready to make a purchase you can use the link to access a Free 30 day Trial of Topaz Labs products to determine whether or not they will fit your own digital workflow.

http://www.topazlabs.com/705.html

==========================================================